Families and students
How do I revise with cards and pictures to explore?
Written by the TestFLE team.
In short
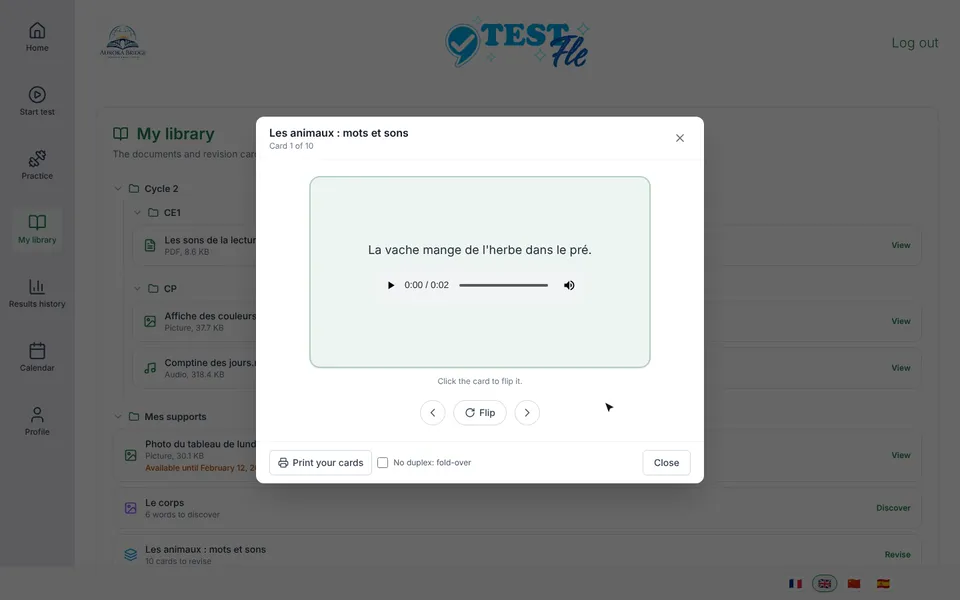
In “My library”, a card deck is revised with “Revise”: you flip each card, then move on to the next. A picture to explore opens with “Discover”: you touch a zone to make its word appear and hear it.
Who this is for, and what you need first
- Who this is for
- Students with whom a teacher has shared a card deck or a picture to explore, and families who want to print the cards.
- What you need first
- The Library option chosen by the school.
- A card deck or a picture to explore shared with the student by a teacher, or linked to a document the student can view.
- An active account. If the account is deactivated, the “My library” entry no longer appears.
Revising cards
- In the menu, click “My library”.
- Find the deck whose line shows cards to revise (“12 cards to revise”, for example).
- Click “Revise”.
- Read the card. Click it, or click “Flip”, to see the other side.
- Click the right arrow to move on to the next card.
- When you have finished, click “Close”.
The right arrow is called “Next card”, and the left one “Previous card”. They sit on either side of the “Flip” button. At the top of the window, a line such as “Card 3 of 12” shows where you are.
Exploring a picture
- In “My library”, find the deck whose line shows words to discover (“6 words to discover”, for example).
- Click “Discover”.
- Touch or click a zone of the picture. The word appears and you hear it.
- To see all the words at once, click “Show all”. The “Hide” button hides them again.
- Close the window with the cross.
The zones are visible as soon as the picture opens, as small, discreet markers. The word stays on screen until the next touch: the child has time to read it. Touching beside the picture closes the word.
Printing the cards
- Open the card deck with “Revise”.
- If the printer cannot print on both sides, tick “No duplex: fold-over”.
- Click “Print your cards”.
- In the browser’s print window, start printing.
Going further
Understanding cards and pictures
Two kinds of deck
A teacher can share two kinds of deck with a student, or with their whole class. Revision cards have a front and a back: each side carries a text, a picture, a sound, or a combination. Pictures to explore show a drawing in which zones hide a word. A deck linked to a document also opens from that document’s window, with “Open the activities” (see the page about documents). When the student loses access to the document, they also lose access to the deck that depends on it, unless the deck is also shared with them directly.
No mark, no score
The student revises freely. Cards and pictures to explore give neither a mark nor a score: the student looks, flips, listens and starts again as often as they like.
Moving from one card to the next
On a keyboard, the right arrow moves on to the next card and the left arrow goes back to the previous card. The space bar and the Enter key flip the card. The Esc key closes the window. On the last card, “Next card” takes you back to the first.
Sounds
When a side carries a sound, an audio player appears on the card. Using it does not flip the card. In a picture to explore, touching a zone plays its word, one sound at a time. If the browser blocks the sound, the word stays on screen.
What printing gives
The cards can be printed, unlike library documents: they are memory aids that you cut out and take with you. By default, printing is double-sided, with eight cards per A4 page. The fronts fill the odd pages and the backs the even pages, arranged so that each back falls behind its front when the sheet is flipped on the long edge.
With the “No duplex: fold-over” box ticked, each card prints on one side only, front and back side by side, separated by a line, with four cards per page. You just cut the cards out and fold along the line. A side that carries a sound is marked with a small loudspeaker: the printed card plays no sound. Pictures to explore cannot be printed.
When nothing is displayed
- A deck with no cards shows “This deck has no cards yet.”
- A picture with no words shows “This picture has no words to discover yet.”
- A picture that is not ready shows “This picture is not ready yet.”
- A deck withdrawn from the student or closed to them shows “This card deck is no longer available.”
The first three messages point to a deck that is not complete yet. The last one points to closed access: ask the teacher whether it should be reopened.
Related articles
- How do I view a library document?Documents that teachers share with a student are viewed from “My library”, with the “View” button. A document cannot be downloaded, and a lesson recording shows its end date.
- Can my child take notes, and who reads them?In “My library”, the student writes their notes in the “Your notes” area next to each document; they save on their own. Their teachers and the school administration can read them, and “Download all my notes” provides them as a spreadsheet.
- What is the Practice area and how does it work?Practice gathers the tests and writing tasks assigned by teachers, or opened by a library document. It opens from “Practice” in the menu and marks each test out of 20, without ever giving a level.